A PhyDE pherogram window
PhyDE is a viewer and editor for alignments and pherograms.
It can read and write the alignment formats NEXUS and FASTA and uses compressed XML files (suffix .pde) as its native format.
Pherograms must be in the format SCF 2.0-3.1/16bit. These are recognized by the suffixes .scf or .scf.gz, the latter being GZIP-compressed. A plugin to convert ABI files to SCF exists.
In addition to usual alignment files, PhyDE supports so called "projects".
Each alignment window has a name field and two editor panes with
a coordinate bar. By using both panes, it is possible to view
discontinuous regions of the alignment simultaneously and, e.g.,
insert data at the 5' end of the alignment and observe resulting
shifts at the 3' end. Since both panes operate on the same data, it
is possible to move a block from one pane to the other.
To change colors of the displayed data, use schemes. To change the font size, it
is easiest to press Strg and scroll the mouse wheel. In effect,
this allows to zoom in and out of the alignment. Alternatively, use
the choice list for font sizes in the upper right corner of the
window. To get an overview over large stretches of an alignment and
a feeling for particularly variable regions, very small font sizes
have been added in version 0.994 that only paint the colors of the
residues but do not show the one-letter abbreviation.
A PhyDE-alignment window contains either nucleotide or amino acid data.
In the case of nucleotide data, it is possible to translate and display the sequences - or part of them - as amino acids. Unless you want to use the standard genetic code (which is the default), first select one of 17 genetic codes in . Then activate the "Mixed" radio button.
To define which part of the sequence should be displayed how, so-called "switches" are used. To set or delete a switch, place the insertion mark at the desired column and use the different commands in the , or click the corresponding icons below the menu bar. The two types of amino switches differ in how gaps are translated: Type A assumes that gaps follow a codon structure, too (i.e. multiple of 3), while type B ignores gaps and simply translates triplets of nucleotides regardless of the number of interspersed gaps. These options for a mixed view are particularly useful for the examination of intron-exon borders and frame shift mutations. To view all sequences as amino acids and tell PhyDE to which codon position the first column corresponds, choose .
To convert nucleotide data to amino acid sequences, use . Prior to this, make sure you have chosen a global frame for the nucleotide alignment. This can be done via .
To export data, use and choose between the (simple) Fasta format (read by most other programs) and NEXUS (used by several phylogenetic analysis tools, including PAUP, MrBayes, HYPHY, BEAST...). Taxon- and character set definitions will be exported as well.
Three edit modi exist: Locked, Align, and Edit.
In the "Align"-modus non-gaps may not change their relative positions and only gaps and '?' may be deleted or inserted. The "Edit"-edit modus allows all operations. Use "locked" if you want to simply view or discuss an alignment, "align" if you are just inserting, deleting, or moving gaps, and "edit" to insert or correct new data. this way the risk of accidentally changing or deleting data is kept at a minimum.
All edit operations apply to the current selection, a shaded area, the coordinates of which are displayed in the lower left corner of the window (numbers in rectangular brackets indicate the number of selected positions/taxa, numbers in curled brackets the number of spanned nucleotides [i.e., ignoring gaps]). The selection can be
To make a rectangular selection or an insertion mark, click in the alignment and drag the mouse, or click for the first corner and shift -click for the second. To select one or more entire columns, click/shift-click/drag in the coordinate bar. In particular, to obtain an insertion mark of the height of the alignment, click in the coordinate bar and press the right or left arrow key.
Note that click/shift-click works across the two editor panes.
To select rows, click/shift-click in the name area.
To empty the selection (rarely needed), click on the lower left corner of the window, where the selected coordinates are displayed.
To expand the selection, type F3 or F4 (Menu Edit). If the curser is within a stretch of nucleotides (or amino acids), F3 selects nucleotides to the left and right up to the nearest gaps. If the curser is within a stretch of gaps, F3 selects gaps to the left and right up to the nearest nucleotides. F4 has the same behavior, but creates a two-dimensional rectangular selection. F3 and F4 are very useful for moving large gaps or inserted blocks.
All edit operations are reversible (). A list of all edit operation follows.
| Insertions | Insert new sequences | Paste copied data as new sequence: Select the sequence below which the data should be pasted, or clear the selection. Then Paste (Menu Edit). |
| Insert data from pherograms: . Select all pherograms you want to import. See section below on pherograms. | ||
| Create a new empty sequence: Corresponding command in Taxa-menu. | ||
| Append sequences from PhyDE-, FASTA- or NEXUS files: choose "Append" from the "File" menu. To open them in a new window, simply drag the file on a PhyDE window. | ||
| Insert gaps (Align or Edit mode) | Make an insertion mark. Type - or space. The difference between space and - is, that space inserts a '?', if the character next to the insertion mark was a '?', and a '-' otherwise. To insert more than one gap, type the number, followed by space (or -). This number is displayed at the bottom of the window (NC:...). It can be reset to 1 with ESC at any time. | |
| If the selection is rectangular, type - or space to fill the selected area with gaps. The originally selected data is moved to the right. This is probably the easiest way to quickly align large stretches of sequence. | ||
| If the selection is rectangular, type shift-space to insert gaps in all sequences except for those with the selection (menu equivalent: ). | ||
| Insert other characters | Make an insertion mark and type the character or a number followed by the character. | |
| Move or sort data | Move selected gaps or nucleotid/amino acids horizontally |
Click into the selected area and drag. In the current version, the move has to be restricted to the visible area of the alignment, or (to move a block out of the visible area) has to be done via RIGHT-clicking into the selected area, scrolling to the target position (which may be in the secong editor pane), then RIGHT-clicking. During the move operation, "Moving..." appears at the bottom of the window. To cancel a long-distance move, type ESC. |
| Rearrange the selected sequences | Use the command "sort by" in the Taxa-menu to sort by name, accession number or any other field that may have been previously defined via (see section Sequence Information below). | |
| Move selected sequences |
Analogous to the horizontal case (drag selection or right-click, drag, left-click on target line). In addition, to move a block of sequences up or down by one, you can type 'u' or 'd'. The keyboard focus must be in the name field at this time. |
|
| Reverse complement | This function reverse-complements the selction. | |
| Delete data | With DEL or BACKSPACE, the current selection will be deleted. In "Align"-mode, only gaps and '?' may be deleted. | |
| Edit sequence information | Select the sequence and type enter. A dialog appears, in which name and other information like the source file (e.g., a trace file or "contig file") can be filled in. |
In addition to the name, any number of additional attributes/features can be assigned to sequences. These can be edited by double-clicking on the sequence or selecting it and then typing return.
If you import FASTA files as produced by GenBank, the "Access No" field will contain the GenBank accession number.
Every sequence can have a source file. This must be a pherogram or .pde file; and for projects, the source file must be placed in (a subdirectory of) the project folder. The source file can be viewed with the corresponding command in the Taxa menu. For sequences which have been generated by , the source file is already filled in.
Additional information can be provided in the "Comment" field.
Since version 0.99 it is possible to define arbitrary fields in addition to the above mentioned ones. These user defined fields will be included in every newly opened alignment window.
To define a new field, use the command "Sequence header" in the Taxa-menu. A field can contain three types of data: a string, a file name, or a number. Every field is identified by its title, it is not allowed to use the same title for different fields. To remove a user-defined field, clear its title. Again, this will only affect new alignment windows, the data already filled in in fields with this title will be maintained.
With labels it is possible to quickly mark and later find particular regions in an alignment.
To add a label, simply select the region (or singel cell) you want to mark, and click the button "Add label" (or press alt-L). The label is attached to the base in the top left corner of the marked region and will follow any positional shifts of this cell that may occur e.g. through insertion of gaps upstream of the label.
To jump to a label, use the scroll list displayed when clicking on the button marked "Label".
To edit a label, double-click on it. If you clear the text field, the label will be deleted. To view/hide labels, check/uncheck from the menu.
The "CSE"-Button views or hides the character set editor. You can define a color for each character set. Character sets are indicated as layers of horizontal lines above the alignment. Multiple lines will be shown for overlapping character sets, depending on which sets are selected for display (checked or unchecked) in the character set editor.
For taxon sets there is a separate editor, which can be invoked from the Taxa menu (Command ). Use "New" to create a new taxon set. Then select the sequences, which should belong to this taxon set. It is possible to quickly select (or deselect, if the mode is "Remove selection") consecutive sequences by shift-click or click-drag.
The command "Find" in the search menu (Strg+F) displays a dialog
that allows specification of the sequence motif to search, whether
the search should occur in the whole file, selected sequence, or
selected area, whether the search should return perfect matches
only (if there are any), or whether "best matches"
should be marked as hit, too. Finally, it allows to specify whether
gaps should be ignored during the search or not. PhyDE marks hits
until you choose "clear match list" from the "Search" menu. Strg+G
cycles through the matches. In addition to entering the motif to
search for (or copy-pasting it) into the Find dialog, it is often
easier to press Strg+E on a selection and the Strg+F to have PhyDE
pre-enter the selected motif into the textfield of the Find dialog
automatically.
To search within taxa/sequence descriptions, press Strg+T
(). To go to a
particular alignment position, use .
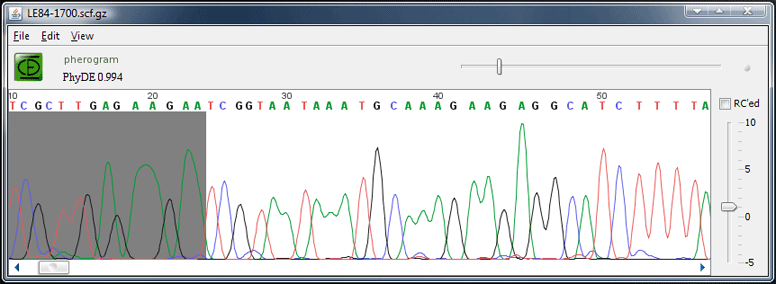
SCF trace files can be displayed in a Pherogram window.
A PhyDE pherogram window
With the "Compress" command from the File menu, the .scf file can be compressed on disk. This is highly recommended. To decompress it again – for example to view the SCF file in another program – use the "Decompress" command from the File menu. Both compressed and uncompressed versions can be read by PhyDE. To read ABI files, first convert them to scf using the plugin "Convert ABI to SCF" after downloading and installing it.
The trace can be reverse-complemented by selecting the "RC'ed" radio button. When a sequence is created with the command "new from pherogram", this information will be taken into account.
A left and right clip region can be defined by first choosing the corresponding command from the Edit menu and then clicking into the trace.
Use "Save" to save any changes. Please note that the original SCF trace data is not changed; the additional information about clipped boundary and reverse complement will be appended at the end of the SCF file and is invisible to other trace viewers.
If a pherogram window has been opened with "View source file" from the "Taxa" menu in an alignment window, it is possible to locate the region which corresponds to the selection in the alignment window by clicking the "Locate selection" button.
In addition to standard alignment files, PhyDE supports so-called "projects". A project is an alignment file (.pde) with a folder associated to it. This folder is meant to contain source files for sequences in the project file. By placing the source file in the project folder, it is possible to save relative pathnames and therefore to move entire projects between different file systems.
To attach a project folder to an alignment, choose a project folder in the File:>File Settings dialog.
It should be noted that any PhyDE-alignment file may contain links to source files, and that these links are always relative (if possible). The advantage of declaring a project folder is that the name of the project folder must be saved only once, and that by renaming the project folder the validity of the links is maintained.
A plugin is a JAVA program, which can be executed by PhyDE. It is possible to write plugins which exchange alignment data with PhyDE.
A plugin comes in two parts: A small text file with suffix .dsc and an executable JAR file. Both must be placed in the subdirectory "plugins" of the directory "PhyDE-Data". After this "installation", when PhyDE is launched, the plugin will appear in the "Plugins" menu.
Check the download area for currently available plugins.
As its native format, PhyDE uses XML files. This has the advantage, that the format can be easily extended in the future.
To save disk space, these file are compressed with GZIP. Various freeware tools exist to decompress this format. To make the file sample.pde human readable on UNIX systems (including MacOS X), one would run the commands
mv sample.pde sample.pde.gz; gzip -d sample.pde.gz
and then open sample.pde with a text editor. It should be noted that PhyDE can also read the resulting decompressed .pde file. On Windows one could use the free program StuffIt Expander, which is also available for other systems.
In addition to GZIP compression, run-length encoding for '?' symbols is used to reduce the size of alignment files.
For further information, or if you want to write a program that produces .pde files, please read here.
The question suggests, that the program once worked. Execute PhyDE from the terminal with
java -jar PhyDE-1.jarwhere "PhyDE-1.jar" has the be replaced with the full path to the JAR-file. The output might give some hint.
Often the program had terminated abnormally before. Then the file "phyde-lock" in the directory "PhyDE-Data" has to be removed, before PhyDE can start again.
To find out what has happened, please consult the Errors & Warnings dialog from the Help menu. Also, there is a file "messages.log" in the directory "PhyDE-Data".
In rare cases, PhyDE can run out of memory. Then you can try to increase the memory associated to JAVA. For example, the command
java -Xmx120m -jar PhyDE-1.jarallows JAVA to use up to 120MB of memory. The default value is 64MB.
Are you using Oracle/Sun java? You can find out which version you are using by running
java -versionin the console window. The output should be something like
java version "1.8.0_11"
Java(TM) SE Runtime Environment (build 1.8.0_11-b12)
Java HotSpot(TM) 64-Bit Server VM (build 25.11-b03, mixed mode)
You could try to activate OpenGL rendering with
java -Dsun.java2d.opengl=true -jar PhyDE-1.jar.